暂未分类 暂未分类 cosbench使用方法 zphj1987 2018-04-12 2024-01-06 ##前言
##安装
下载最新版本
https://github.com/intel-cloud/cosbench/releases/download/v0.4.2.c4/0.4.2.c4.zip
1
2
[root@lab102 cosbench] [root@lab102 cosbench]
访问地址
http://HOST-IP:19088/controller/index.html
同时可以执行的workloads的个数通过下面的control参数控制
concurrency=1
默认是一个,这个为了保证单机的硬件资源足够,保持单机启用一个workload
创建一个s3用户
1
2
3
4
5
6
7
8
9
10
11
12
13
14
15
16
17
18
19
20
21
22
23
24
25
26
27
28
29
30
31
32
33
34
35
[root@lab101 ~] { "user_id" : "test1" , "display_name" : "test1" , "email" : "" , "suspended" : 0, "max_buckets" : 1000, "auid" : 0, "subusers" : [], "keys" : [ { "user" : "test1" , "access_key" : "test1" , "secret_key" : "test1" } ], "swift_keys" : [], "caps" : [], "op_mask" : "read, write, delete" , "default_placement" : "" , "placement_tags" : [], "bucket_quota" : { "enabled" : false , "max_size_kb" : -1, "max_objects" : -1 }, "user_quota" : { "enabled" : false , "max_size_kb" : -1, "max_objects" : -1 }, "temp_url_keys" : [] }
##配置相关
cosbench的配置文件结构
一个workload 可以定义一个或者多个work stages
执行多个work stages是顺序的,执行同一个work stage里面的work是可以并行执行的
每个work里面,worker是来调整负载的
认证可以多个级别的定义,低级别的认证会覆盖高级别的配置
可以通过配置多个work的方式来实现并发,而在work内通过增加worker的方式增加并发,从而实现多对多的访问,worker的分摊是分到了driver上面,注意多work的时候的containers不要重名,划分好bucker的空间
work相关的说明
可以通过写入时间,写入容量,写入iops来控制什么时候结束
interval默认是5s是用来对性能快照的间隔,可以理解为采样点
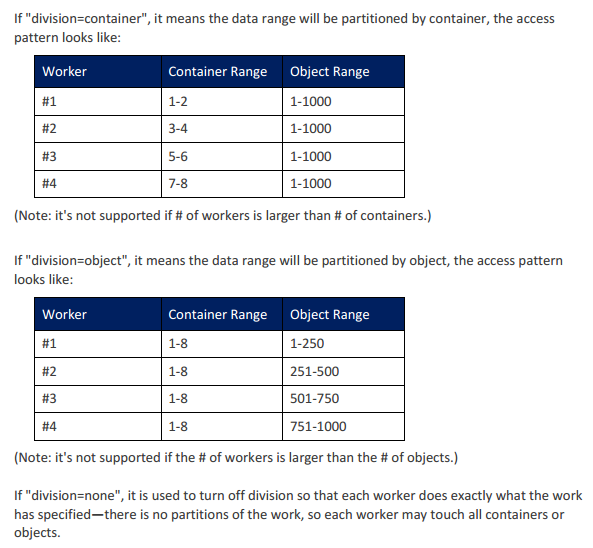
division 控制workers之间的分配工作的方式是bucket还是对象还是none
默认全部的driver参与工作,也可以通过参数控制部分driver参与
时间会控制执行,如果时间没到,但是指定的对象已经写完了的话就会去进行复写的操作,这里要注意是进行对象的控制还是时间的控制进行的测试
如果读取测试的时候,如果没有那个对象,会中断的提示,所以测试读之前需要把测试的对象都填充完毕(最好检查下先)
##单项的配置文件
###通过单网关创建bucket
1
2
3
4
5
6
7
8
9
10
11
12
13
14
15
<?xml version="1.0" encoding="UTF-8" ?> <workload name="create-bucket" description="create s3 bucket" config="" > <auth type ="none" config="" /> <workflow config="" > <workstage name="create bucket" closuredelay="0" config="" > <auth type ="none" config="" /> <work name="rgw1" type ="init" workers="2" interval="5" division="container" runtime="0" rampup="0" rampdown="0" afr="0" totalOps="1" totalBytes="0" config="cprefix=zp;containers=r(1,8)" > <auth type ="none" config="" /> <storage type ="s3" config="accesskey=test1;secretkey=test1;endpoint=http://66.66.66.63:7481;path_style_access=true" /> </work> </workstage> </workflow> </workload>
执行完建议检查下是不是创建了这么多的bucket,之前测试的时候发现即使没有创建成功bucket,在put的时候也不会报错,bucket并没有创建成功,读取的时候才抛出的错,总之每做一步确认下上一步的结果
执行检查
1
2
3
4
5
6
7
8
9
10
11
[root@lab101 ~] [ "zp2" , "zp8" , "zp7" , "zp3" , "zp4" , "zp6" , "zp5" , "zp1" ]
如上配置的时候,如果设置的是workers=1,那么就会从当前的driver中挑选一个driver出来,然后选择配置storage进行bucket的创建,如果设置的是workers=2,那么就会挑选两个driver出来进行创建,一个driver负责一半的工作,相当于两个客户端同时向一个网关发起创建的操作,cprefix参数是控制创建的bucket的前缀的
rgw的网关是对等的关系,那么这里肯定就有另外一种配置,我想通过不只一个网关进行创建的操作,那么这个地方是通过增加work的配置来实现的,我们看下配置
###通过多网关创建bucket
1
2
3
4
5
6
7
8
9
10
11
12
13
14
15
16
17
18
19
20
21
<?xml version="1.0" encoding="UTF-8" ?> <workload name="create-bucket" description="create s3 bucket" config="" > <auth type ="none" config="" /> <workflow config="" > <workstage name="create bucket" closuredelay="0" config="" > <auth type ="none" config="" /> <work name="rgw1" type ="init" workers="2" interval="5" division="container" runtime="0" rampup="0" rampdown="0" afr="0" totalOps="1" totalBytes="0" config="cprefix=zp;containers=r(1,4)" > <auth type ="none" config="" /> <storage type ="s3" config="accesskey=test1;secretkey=test1;endpoint=http://66.66.66.63:7481;path_style_access=true" /> </work> <work name="rgw2" type ="init" workers="2" interval="5" division="container" runtime="0" rampup="0" rampdown="0" afr="0" totalOps="1" totalBytes="0" config="cprefix=zp;containers=r(4,8)" > <auth type ="none" config="" /> <storage type ="s3" config="accesskey=test1;secretkey=test1;endpoint=http://66.66.66.63:7482;path_style_access=true" /> </work> </workstage> </workflow> </workload>
以上配置就实现了通过两个网关进行创建bucket的配置了,下面是做prepare的相关配置,在cosbench里面有两个部分可以进行写操作,在prepare stage里面和 main stage里面
在写的部分是一样的
###通过多网关写数据
1
2
3
4
5
6
7
8
9
10
11
12
13
14
15
16
17
18
19
20
21
22
23
24
25
26
27
<?xml version="1.0" encoding="UTF-8" ?> <workload name="create-object" description="create object" config="" > <auth type ="none" config="" /> <workflow config="" > <workstage name="putobject" closuredelay="0" config="" > <auth type ="none" config="" /> <work name="rgw1-put-4M" type ="normal" workers="2" interval="5" division="container" runtime="0" rampup="0" rampdown="0" afr="200000" totalOps="240" totalBytes="0" config="" > <auth type ="none" config="" /> <storage type ="s3" config="timeout=300000;accesskey=test1;secretkey=test1;endpoint=http://66.66.66.63:7481;path_style_access=true" /> <operation type ="write" ratio="100" division="none" config="cprefix=zp;containers=r(1,4);oprefix=hj;objects=r(1,240);sizes=c(64)KB" id ="op1" /> </work> <work name="rgw2-put-4M" type ="normal" workers="2" interval="5" division="container" runtime="0" rampup="0" rampdown="0" afr="200000" totalOps="240" totalBytes="0" config="" > <auth type ="none" config="" /> <storage type ="s3" config="timeout=300000;accesskey=test1;secretkey=test1;endpoint=http://66.66.66.63:7482;path_style_access=true" /> <operation type ="write" ratio="100" division="none" config="cprefix=zp;containers=r(5,8);oprefix=hj;objects=r(1,240);sizes=c(64)KB" id ="op1" /> </work> </workstage> </workflow> </workload>
这里有几个参数可以注意一下:
cprefix=zp;containers=r(1,4);oprefix=hj;objects=r(1,240);sizes=c(64)KB” id=”op1”
控制写入的bucket的名称的,是全部散列还是把负载均分可以自己去控制,objects是指定写入bucke里面的对象的名称的,sizes是指定大小的,如果两个值不同,就是设置的范围,相同就是设置的指定大小的
1 runtime="0" rampup="0" rampdown="0" afr="200000" totalOps="240" totalBytes="0"
这个是控制写入什么时候中止的,可以通过时间,也可以通过总的ops,或者总的大小来控制,这个需求可以自己定,afr是控制允许的失效率的,单位为1百万分之
这个是控制抓取性能数据的周期的
写的部分还可以通过prepare控制,因为读和写需要对应上,不然读取会报错,所以这里还有一种方法写数据
我们在测试的时候,有时候有两种需求,一种是我只关注读取,那么就需要准备好测试数据,不用关心写入的性能,一种是我想看下复写的性能,那么也是需要把数据先填充完,那么这种情况的填充就不用iops控制,也不用时间控制了,我需要填充满,那么cosbench里面就提供了这种写法,就是prepare这个写类型做了的,我们看下配置文件
1
2
3
4
5
6
7
8
9
10
11
12
13
14
15
16
17
18
19
20
21
<?xml version="1.0" encoding="UTF-8" ?> <workload name="create-object" description="create object" config="" > <auth type ="none" config="" /> <workflow config="" > <workstage name="prepare-rgw1" closuredelay="0" config="" > <auth type ="none" config="" /> <work name="prepare" type ="prepare" workers="2" interval="5" division="object" runtime="0" rampup="0" rampdown="0" afr="0" totalOps="1" totalBytes="0" config="cprefix=zp;oprefix=hj;containers=r(1,4);objects=r(1,240);sizes=u(64,64)KB" > <storage type ="s3" config="timeout=300000;accesskey=test1;secretkey=test1;endpoint=http://66.66.66.63:7481;path_style_access=true" /> </work> <work name="prepare-rgw2" type ="prepare" workers="2" interval="5" division="object" runtime="0" rampup="0" rampdown="0" afr="0" totalOps="1" totalBytes="0" config="cprefix=zp;oprefix=hj;containers=r(5,8);objects=r(1,240);sizes=u(64,64)KB" > <storage type ="s3" config="timeout=300000;accesskey=test1;secretkey=test1;endpoint=http://66.66.66.63:7482;path_style_access=true" /> </work> </workstage> </workflow> </workload>
division这个参数用下面的这张图比较好解释
写入的配置就完了
###并发读取的配置
1
2
3
4
5
6
7
8
9
10
11
12
13
14
15
16
17
18
19
20
21
22
23
24
25
26
<?xml version="1.0" encoding="UTF-8" ?> <workload name="read-object" description="create object" config="" > <auth type ="none" config="" /> <workflow config="" > <workstage name="readobject" closuredelay="0" config="" > <auth type ="none" config="" /> <work name="rgw1-put-4M" type ="normal" workers="2" interval="5" division="container" runtime="0" rampup="0" rampdown="0" afr="200000" totalOps="240" totalBytes="0" config="" > <auth type ="none" config="" /> <storage type ="s3" config="timeout=300000;accesskey=test1;secretkey=test1;endpoint=http://66.66.66.63:7481;path_style_access=true" /> <operation type ="read" ratio="100" division="none" config="cprefix=zp;containers=r(1,4);oprefix=hj;objects=r(1,240);sizes=c(64)KB" id ="op1" /> </work> <work name="rgw2-read-4M" type ="normal" workers="2" interval="5" division="container" runtime="0" rampup="0" rampdown="0" afr="200000" totalOps="240" totalBytes="0" config="" > <auth type ="none" config="" /> <storage type ="s3" config="timeout=300000;accesskey=test1;secretkey=test1;endpoint=http://66.66.66.63:7482;path_style_access=true" /> <operation type ="read" ratio="100" division="none" config="cprefix=zp;containers=r(5,8);oprefix=hj;objects=r(1,240);sizes=c(64)KB" id ="op1" /> </work> </workstage> </workflow> </workload>
###删除对象的配置
1
2
3
4
5
6
7
8
9
10
11
12
13
14
15
16
17
18
19
20
21
22
<?xml version="1.0" encoding="UTF-8" ?> <workload name="read-object" description="create object" config="" > <auth type ="none" config="" /> <workflow config="" > <workstage name="rgw1-cleanup" closuredelay="0" config="" > <auth type ="none" config="" /> <work name="rgw1-cleanup" type ="cleanup" workers="2" interval="5" division="object" runtime="0" rampup="0" rampdown="0" afr="0" totalOps="1" totalBytes="0" config="cprefix=zp;containers=r(1,4);oprefix=hj;objects=r(1,240);deleteContainer=false;" > <auth type ="none" config="" /> <storage type ="s3" config="timeout=300000;accesskey=test1;secretkey=test1;endpoint=http://66.66.66.63:7481;path_style_access=true" /> </work> <work name="rgw2-cleanup" type ="cleanup" workers="2" interval="5" division="object" runtime="0" rampup="0" rampdown="0" afr="0" totalOps="1" totalBytes="0" config="cprefix=zp;containers=r(5,8);oprefix=hj;objects=r(1,240);deleteContainer=false;" > <auth type ="none" config="" /> <storage type ="s3" config="timeout=300000;accesskey=test1;secretkey=test1;endpoint=http://66.66.66.63:7482;path_style_access=true" /> </work> </workstage> </workflow> </workload>
###删除bucket的配置
1
2
3
4
5
6
7
8
9
10
11
12
13
14
15
16
17
18
19
20
21
<?xml version="1.0" encoding="UTF-8" ?> <workload name="read-object" description="create object" config="" > <auth type ="none" config="" /> <workflow config="" > <workstage name="dispose" closuredelay="0" config="" > <auth type ="none" config="" /> <work name="rgw1-dispose" type ="dispose" workers="2" interval="5" division="container" runtime="0" rampup="0" rampdown="0" afr="0" totalOps="1" totalBytes="0" config="cprefix=zp;containers=r(1,4);" > <auth type ="none" config="" /> <storage type ="s3" config="timeout=300000;accesskey=test1;secretkey=test1;endpoint=http://66.66.66.63:7481;path_style_access=true" /> </work> <work name="rgw2-dispose" type ="dispose" workers="2" interval="5" division="container" runtime="0" rampup="0" rampdown="0" afr="0" totalOps="1" totalBytes="0" config="cprefix=zp;containers=r(5,8);" > <auth type ="none" config="" /> <storage type ="s3" config="timeout=300000;accesskey=test1;secretkey=test1;endpoint=http://66.66.66.63:7482;path_style_access=true" /> </work> </workstage> </workflow> </workload>
上面的workstage一共包括下面几种
init 创建bucket
normal write 写入对象
normal read 读取对象
cleanup 清理对象
dispose 清理bucket
division是控制多个worker之间的操作怎么去分的控制,最好在operation那层进行控制
##测试前自我提问
单机用了几个workload(默认一般一个,保证单个测试资源的独占)
采用了几个driver(决定了客户端的发起是有几个客户端,单机一个就可以)
测试了哪几个项目(init,prepare or normal,remove),单独测试还是混合测试
单个项目的workstage里面启动了几个work(work可以控制请求发向哪里)
单个work里面采用了几个workers(这个是控制几个driver进行并发的)
测试的ceph集群有多少个rgw网关,创建了多少个bucket测试
设置的写入每个bucket的对象为多少?对象大小为多少?测试时间为多久?
测试很多文件的时候,可以用ops控制,并且将ops设置大于想测试的文件数目,保证能写入那么多的数据,或者比较确定性能,也可以通过时间控制
那么我来根据自己的需求来进行一个测试模型说明,然后根据说明进行配置
采用两个客户端测试,那么准备两个driver
准备配置两个rgw的网关,那么在配置workstage的时候配置两个work对应到两个storage
测试创建,写入,读取,删除对象,删除bucket一套完整测试
wokers设置为2的倍数,初始值为2,让每个driver分得一半的负载,在进行一轮测试后,成倍的增加driver的数目,来增大并发,在性能基本不增加,时延在增加的时候,记录性能值和参数值,这个为本环境的最大性能
创建8个bucket,每个bucket写入30个64K的对象,测试文件数目为240个
简单框架图
配置文件如下:
1
2
3
4
5
6
7
8
9
10
11
12
13
14
15
16
17
18
19
20
21
22
23
24
25
26
27
28
29
30
31
32
33
34
35
36
37
38
39
40
41
42
43
44
45
46
47
48
49
50
51
52
53
54
55
56
57
58
59
60
61
62
63
64
65
66
67
68
69
70
71
72
73
74
75
76
77
78
79
80
81
82
83
84
85
86
87
88
89
90
91
92
93
94
95
96
97
98
99
<?xml version="1.0" encoding="UTF-8" ?> <workload name="create-bucket" description="create s3 bucket" config="" > <auth type ="none" config="" /> <workflow config="" > <workstage name="create bucket" closuredelay="0" config="" > <auth type ="none" config="" /> <work name="rgw1" type ="init" workers="2" interval="5" division="container" runtime="0" rampup="0" rampdown="0" afr="0" totalOps="1" totalBytes="0" config="cprefix=zp;containers=r(1,4)" > <auth type ="none" config="" /> <storage type ="s3" config="accesskey=test1;secretkey=test1;endpoint=http://66.66.66.63:7481;path_style_access=true" /> </work> <work name="rgw2" type ="init" workers="2" interval="5" division="container" runtime="0" rampup="0" rampdown="0" afr="0" totalOps="1" totalBytes="0" config="cprefix=zp;containers=r(4,8)" > <auth type ="none" config="" /> <storage type ="s3" config="accesskey=test1;secretkey=test1;endpoint=http://66.66.66.63:7482;path_style_access=true" /> </work> </workstage> <workstage name="putobject" closuredelay="0" config="" > <auth type ="none" config="" /> <work name="rgw1-put-4M" type ="normal" workers="2" interval="5" division="container" runtime="0" rampup="0" rampdown="0" afr="200000" totalOps="240" totalBytes="0" config="" > <auth type ="none" config="" /> <storage type ="s3" config="timeout=300000;accesskey=test1;secretkey=test1;endpoint=http://66.66.66.63:7481;path_style_access=true" /> <operation type ="write" ratio="100" division="none" config="cprefix=zp;containers=r(1,4);oprefix=hj;objects=r(1,240);sizes=c(64)KB" id ="op1" /> </work> <work name="rgw2-put-4M" type ="normal" workers="2" interval="5" division="container" runtime="0" rampup="0" rampdown="0" afr="200000" totalOps="240" totalBytes="0" config="" > <auth type ="none" config="" /> <storage type ="s3" config="timeout=300000;accesskey=test1;secretkey=test1;endpoint=http://66.66.66.63:7482;path_style_access=true" /> <operation type ="write" ratio="100" division="none" config="cprefix=zp;containers=r(5,8);oprefix=hj;objects=r(1,240);sizes=c(64)KB" id ="op1" /> </work> </workstage> <workstage name="readobject" closuredelay="0" config="" > <auth type ="none" config="" /> <work name="rgw1-put-4M" type ="normal" workers="2" interval="5" division="container" runtime="0" rampup="0" rampdown="0" afr="200000" totalOps="240" totalBytes="0" config="" > <auth type ="none" config="" /> <storage type ="s3" config="timeout=300000;accesskey=test1;secretkey=test1;endpoint=http://66.66.66.63:7481;path_style_access=true" /> <operation type ="read" ratio="100" division="none" config="cprefix=zp;containers=r(1,4);oprefix=hj;objects=r(1,240);sizes=c(64)KB" id ="op1" /> </work> <work name="rgw2-read-4M" type ="normal" workers="2" interval="5" division="container" runtime="0" rampup="0" rampdown="0" afr="200000" totalOps="240" totalBytes="0" config="" > <auth type ="none" config="" /> <storage type ="s3" config="timeout=300000;accesskey=test1;secretkey=test1;endpoint=http://66.66.66.63:7482;path_style_access=true" /> <operation type ="read" ratio="100" division="none" config="cprefix=zp;containers=r(5,8);oprefix=hj;objects=r(1,240);sizes=c(64)KB" id ="op1" /> </work> </workstage> <workstage name="rgw1-cleanup" closuredelay="0" config="" > <auth type ="none" config="" /> <work name="rgw1-cleanup" type ="cleanup" workers="2" interval="5" division="object" runtime="0" rampup="0" rampdown="0" afr="0" totalOps="1" totalBytes="0" config="cprefix=zp;containers=r(1,4);oprefix=hj;objects=r(1,240);deleteContainer=false;" > <auth type ="none" config="" /> <storage type ="s3" config="timeout=300000;accesskey=test1;secretkey=test1;endpoint=http://66.66.66.63:7481;path_style_access=true" /> </work> <work name="rgw2-cleanup" type ="cleanup" workers="2" interval="5" division="object" runtime="0" rampup="0" rampdown="0" afr="0" totalOps="1" totalBytes="0" config="cprefix=zp;containers=r(5,8);oprefix=hj;objects=r(1,240);deleteContainer=false;" > <auth type ="none" config="" /> <storage type ="s3" config="timeout=300000;accesskey=test1;secretkey=test1;endpoint=http://66.66.66.63:7482;path_style_access=true" /> </work> </workstage> <workstage name="dispose" closuredelay="0" config="" > <auth type ="none" config="" /> <work name="rgw1-dispose" type ="dispose" workers="2" interval="5" division="container" runtime="0" rampup="0" rampdown="0" afr="0" totalOps="1" totalBytes="0" config="cprefix=zp;containers=r(1,4);" > <auth type ="none" config="" /> <storage type ="s3" config="timeout=300000;accesskey=test1;secretkey=test1;endpoint=http://66.66.66.63:7481;path_style_access=true" /> </work> <work name="rgw2-dispose" type ="dispose" workers="2" interval="5" division="container" runtime="0" rampup="0" rampdown="0" afr="0" totalOps="1" totalBytes="0" config="cprefix=zp;containers=r(5,8);" > <auth type ="none" config="" /> <storage type ="s3" config="timeout=300000;accesskey=test1;secretkey=test1;endpoint=http://66.66.66.63:7482;path_style_access=true" /> </work> </workstage> </workflow> </workload>
上面的测试是为了做测试模板,所以采用了比较小的对象数目和比较小的测试时间
可以根据自己的硬件环境或者客户的要求来设计测试模型,环境够大的时候,提供足够的rgw和足够的客户端才能测出比较大的性能值
测试的时候,尽量把写入和读取的测试分开,也就是分两次测试,避免第一次的写入没写足够对象,读取的时候读不到中断了,对于长达数小时的测试的时候,中断是很令人头疼的,分段可以减少这种中断后的继续测试的时间
写入的测试在允许的范围内,尽量写入多点对象,尽量避免复写,也能够在读取的时候尽量能够足够散列
测试时间能够长尽量长
##测试结果
可以通过线图来看指定测试项目的中间情况,一般是去关注是否出现比较大的抖动 ,相同性能下,抖动越小越好
##其他调优
##补充一个BUG
1
2
3
4
about setting the property: stop all cosbench processes (controller, drivers) edit cosbench-start.sh, locate the java launching line, and add "-Dcom.amazonaws.services.s3.disableGetObjectMD5Validation=true" restart cosbench processes
来源:https://github.com/intel-cloud/cosbench/issues/320
变更记录
Why
Who
When
创建
武汉-运维-磨渣
2018-04-12
修改测试模式时间为文件数目控制
武汉-运维-磨渣
2019-03-15